Rhythm of A Life

Pages

  • Home
  • About Me
  • Fashion
  • Beauty
  • Music
  • My Life

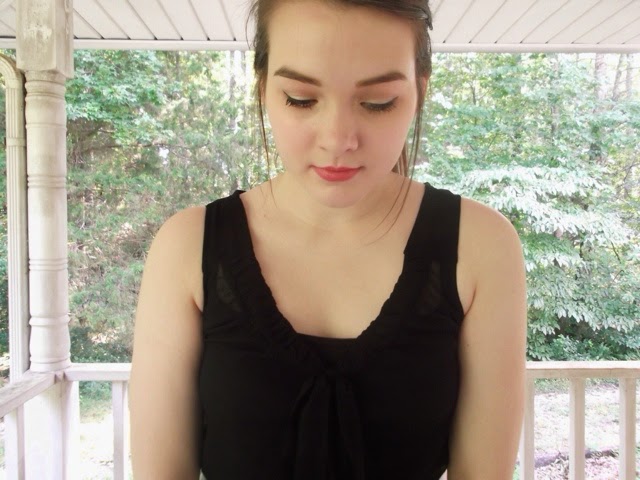
I mentioned that I had been wanting some "in your face" red eyeshadow in this post where I talked about a Modern Renaissance Dupe. I went to see twenty one pilots in early March and wanted my makeup to go with their general aesthetics which are red and black. I'd been itching to wear black lipstick for a while, and their drummer Josh Dun wears red eye makeup. I figured this was the perfect opportunity to go all out. I've always been interested in Lime Crime, but I know there are a lot of shady things to be said about their business. I'd been staring at the Venus palette and debating about possibly biting the bullet and ordering it when I stumbled on Hush. I spotted the Venus palette from Okalan, and I decided what's better than one palette with red eyeshadow? That's right, two palettes with red eyeshadow. With this one, you've got just enough neutrals that you could do a day to day kind of eye look, but enough color to make this palette worth a shot for what I was looking for. The mix makes it really nice for travel because you can go neutral or more daring. The inside also looks just like the original Venus palette. I'm obsessed. The quality is incredible especially on the mattes which make up the majority of this palette. They're so pigmented, blendable, and buildable. The shimmers are still pretty good as well, but I do find that I need a base to get as bright of an effect as I want. I'll include swatches of everything below! Also, I included a picture of how my makeup turned out for the concert that I went to! I was IN LOVE with it.


Left to Right: Venus, Shell, Aura, Creation
Left to Right: Icon, Rebirth, Divine, Muse

Thinking about doing a get ready with me type of post/video(???) soon! Let me know if that would be something you'd be interested in...
Share
Tweet
Pin
Share
No comments

Now that it is finally Christmas break, one of the year's few vacation seasons is just beginning. For this makeup look today, I decided to take inspiration from one of America's most popular vacation destinations - Las Vegas. One of the most important parts of packing for a trip for me includes making sure the contents of my makeup bag are versatile. Today, I'm going to walk you through how I transitioned this simple day look into a more dramatic night look with just a few quick changes!

Day


For day, there are so many options for activities in Las Vegas. You can chill poolside, visit the spa, or hit the casino (if you have extra money unlike this broke grad student). My personally preferred activity on vacation is always shopping, of course. For a shopping day, I want to keep my makeup simple. Also in anticipation of the transition to night, I want to take some extra steps for lasting power. I started with a moisturizer in SPF which is a step that I never skip (and definitely not in sunny Vegas). Then, I put on a light layer of the L'oreal True Match Foundation in Porcelain, my trusty Maybelline Fit Me concealer in 15 Fair for dark circles or blemishes, and some Better Skin powder to set it. To finish off my base, I used Physician's Formula Mineral Blush in Natural and Essence Make Me Brow to set my brows. For extra staying power, I primed my eyes with the Maybelline Color Tattoo Concentrated Crayon in Barely Beige. In any vacation, I love to bring my Too Faced Chocolate Bar Palette because it is so versatile. For this day look, I put the gold shade Creme Brûlée on my lid with a mix of Salted Caramel and Milk Chocolate through the crease. To finish the eyes, I used the Physician's Formula Eye Booster Liquid Liner in Dark Brown (great drugstore alternative to the Tattoo Liner) and Covergirl's Super Sizer mascara in Black/Brown. I like brown options for the day time because they are softer. On the lips, the Revlon Just Bitten Kissable Balm Stain in Honey is perfect for any casual day.

Night


After a long day of shopping, I'd love to see a show in Las Vegas. Some of my top picks would be Cirque du Soleil, Britney Spears, or Jennifer Lopez. My goal for this look is just to add to the base that I built earlier. For the skin, I would top up on powder and possibly add more blush. Then, I'd want to contour and highlight as I feel like this takes a look to the next level. My go-to products for that are the NYX HD blush in the shade Taupe and The Balm's Mary Lou Manizer. I contour under my cheekbones, some on the forehead, and under the jawline. I highlight on top of my cheekbones, down the bridge of my nose, and the inner corner of the eyes. Now to the eyes, I added some of the shade Cherry Cordial from the Chocolate Bar palette to the outer corners of the eyes and blended through the crease. I also used this to smoke out the lower lashline. Then, I traced over the brown liner with the Kat Von D Tattoo liner in Trooper and added a wing for a dramatic touch. At this point, you could pop on a pair of false lashes. I opted for some extra coats of waterproof mascara on the top and bottom lashes as I have not quite mastered the art of applying falsies. For the final touch, I added the Stila Stay All Day Liquid Lipstick in the shade Beso. This red is perfect for any night out and doesn't transfer too much (Christmas/New Year's parties anyone?)

I hope you enjoyed this day to night transition! If you are dreaming of a vacation, check out some of the best Vegas deals here!

What are your go to products for a night out? 


Share
Tweet
Pin
Share
No comments
Hello...it's me. So I haven't blogged in nearly a year. I'm just planning on popping up posts every once in a while when I'm feeling inspired. I've got a few in mind. Today, I'm sharing a sale that is too good to miss in my opinion. Last year at holiday time, Benefit put out a cheek set and I was so sad when I found it sold out right after it came out. This year I was on the look out hoping for a new one, and they didn't disappoint! This year it is called the Real Cheeky Party set. It has 4 blushes, 1 bronzer, 1 highlighter, and deluxe size samples of the They're Real Mascara and Push Up liner. The blushes it includes are Dandelion, Rockateur, Sugarbomb, and Coralista. The bronzer is their famous Hoola bronzer and the highlighter is their cream Watt's Up. It was originally priced at $42 dollars and is said to be a $116 dollar value. It is a limited edition set that comes in a nicely sized tin with bright Benefit packaging.. Recently, the price at Sephora and Ulta dropped to $30 dollars. That is when I was sold on it (Also through 1/1 if you order at Sephora using the code EXTRA20, you can get it for $24!). A Benefit boxed blush is $28 dollars on its own. While this doesn't have the same amount of product as the full sized, you are getting to try 5 different colors. It has matte and shimmer options of blush. From the swatches, they seem like a perfect amount of pigment for a blush that you can build or sweep on quite naturally. You can see which really work on your skin tone and which products you use the most. If you've been looking for an opportunity to try their cheek products, this is a great one. I am so excited about this kit, and I can't wait to start using it in my every day makeup!
From left to right: Dandelion, Rockateur, Sugarbomb, Hoola, Coralista

Hopefully, I'll talk to you soon!

Share
Tweet
Pin
Share
No comments
Hello! I wanted to take a moment to share my current favorite eye shadow palette with you. In my after Christmas shopping, I noticed that it is no longer being carried at Ulta or Sephora. Of course, I'm not going to share something with you that you can't get anywhere though. It is still available on Stila's website for only $20. When I picked it up at a Sephora (during double points season), it was $40. Stila's single eyeshadows sell for $18, so this is such a great deal that I had to share. It has 10 shades that all fall into a neutral family and one of their Smudgestick Eyeliners in Damsel which is a matte brown. I'd heard a lot of great things about it on YouTube, and it seemed like a great every day palette and travel friendly. Honestly, the fact that the shade Kitten is in this palette was enough to convince me. It is the most beautiful champagne shade and works great as an inner corner highlight or lid shade. Bliss is a great transition shade and works well in the crease for daytime looks. Bubbly (the gold shade) is my favorite shadow to pair with deep red or berry lipsticks. Night Sky (sparkly blue/grey) is a really unique shade that I've yet to find a comparable drugstore shadow. All the shades are beautiful and work so well together. The only one that might disappoint is the matte black Ebony. It doesn't swatch as full color as expected. It can be built up if desired. Personally, that doesn't bother me as I've yet to figure out a way to incorporate black shadow into my makeup. If you've been looking for a high quality neutrals palette and you've got $20 lying around, this is a great one that you could try! You can pick it up here! Below, I've got photos and swatches. Hope you enjoy!


Shades from Left to Right
Top Row: Bare, Kitten, Bliss, Sunset, Sandstone
Bottom Row: Bubbly, Gilded Gold, Luster, Night Sky, Ebony
Swatches from left to right: Bare, Kitten, Bliss, Sunset, Sandstone, Bubbly, Gilded Gold, Luster, Night Sky, Ebony
What is your favorite eyeshadow palette? I'd love to hear about some new ones to try!
Share
Tweet
Pin
Share
No comments
Hello! Merry Christmas to you! I'm currently out of town and in a place with no internet, so sorry this post won't be Christmas themed. This is going to be a flashback post that I wrote in the summer, but my thoughts are still the same even after months of testing. I'm sharing another face of the day with you because I have been really excited about this product recently and wanted to give it some time in the spotlight. You'll have to excuse that that day is not actually today...In my time on Bloglovin, I have seen a lot about a highlighter called the Mary-Lou Manizer from TheBalm. I was never willing to make the jump and get it for two reasons. One, I wouldn't have been able to try it before buying it as it wasn't stocked in stores anywhere. Two, I would have had to pay shipping which I never like to do. Recently, Kohl's has started carrying TheBalm in their makeup section, so I made the jump and picked it up. It is priced at $24 dollars. That might seem like a lot, but you are getting 8.5 grams of product. You aren't using it on your entire face, and it is so pigmented that you hardly need any to get the effect you want. I figure this will be in my collection for quite some time, and I've been using everyday that I put on makeup. I've still yet to hit pan on it even after 5 months. This is the first highlighter that I have ever owned, and I'm pretty confident that I made a good decision on it. It is a champagne shade, and it does have shimmer in it. Don't worry though. It isn't large chunks of glitter or anything. Like I said earlier, it is extremely pigmented, so you do want to be careful when you're applying it. No one wants to look like a disco ball or like you have shimmery tribal stripes down your face. I like to put it on my cheekbones, the inner corners of my eyes, brow bones, and Cupid's bow. I apply it with the elf Small Stipple brush because it is the perfect size for the areas you want to highlight. When you apply it right, it really gives you a "glowing from within" kind of look. Now that we are transitioning into fall, it the perfect product to liven up dull looking skin. In the look below, I used it as a highlighter and an eyeshadow to show its pigmentation and color for you. I did my best to catch it in the sunshine, so you could see the glow off the cheekbones. I couldn't be happier with this purchase, and it is definitely worth a swatch the next time you are in Kohl's.


I've had so many people ask me what I've got on as an inner corner highlight lately, so this product is definitely doing its job. This has been an absolute life saver this winter. It just livens up dull looking skin and brightens up your "I've had 5 tests this week" tired eyes.

P.S. In case you were wondering, I've got the Revlon Balm Stain in Honey on my lips.

Disclaimer: Some of the links above are affiliate links.

Share
Tweet
Pin
Share
No comments
Hello! When I spotted this tag over on Lily Pebbles blog, I thought it would a fun post to share. That's exactly what I'm doing today. Basically, you break down your makeup routine into steps like concealer, eyes, etc., and time yourself to see how long it takes you do it. You do it at your normal pace, so you are getting an accurate representation. I went for the whole nine yards here and did every step that I do when I've got enough time to really get ready. I'll share my times and the products I used below!


Foundation: L'oreal True Match Lumi in Neutral Soft Ivory/Classic Ivory
Concealer: Maybelline Dream Lumi Touch in Radiant and Maybelline Fit Me in 15 Fair
Powder: Maybelline Dream Wonder Powder in 15 Ivory and Rimmel Stay Matte in 001 Transparent
Blush: Wet N Wild Pearlescent Pink
Highlight: TheBalm's Mary-Lou Manizer
Eyes: Wet N Wild Walking on Eggshells Trio, Kat Von D Tattoo Liner in Trooper, and Rimmel Scandal Eyes Retroglam Mascara in Black
Brows: Light Brown shade from the NYX Nude on Nude Palette
Lips: Fran Wilson Mood Matcher Lipstick in Red


If you do this tag, I would love to see it! What step do you think you spend the most time on?
Share
Tweet
Pin
Share
1 comments
Hello! One of my favorite kinds of beauty videos to watch on YouTube is empties videos. Over the course of the summer, I started collecting all the products that I have used up to throw into a post together. I'm going to give you a rundown of the products and I'll share some thoughts as well. If you want more info about any of them, you can click their names which are linked to other websites with reviews and prices. Let it be known that I have been using a lot of these products for a while. I didn't just buy them and use them all in the course of 2 months. I broke it down into categories of makeup, skincare, haircare, shower, and perfumes. Now that I've said that, let's get started.


Makeup

There are two liquid eyeliners in this, and they are the Maybelline Master Precise Liquid Eyeliner and the Maybelline 2 in 1 Master Duo Liquid Eyeliner. I liked them both a lot at first, but that definitely faded over time. With the Master Precise liner, the felt tip is really long and goes to a very thin point. At first, that is great because it makes getting a really nice line super easy. After about a month, the very end of the felt tip starts to dry up which makes winging your eyeliner out impossible. The Master Duo Liner is a pot that you dip your brush into. I like that because you liner isn't going to dry up. I had trouble with this brush being a little too thick for my liking. It was a bit too easy to get carried away and start looking like a raccoon. Also, the formula flaked off quite easily on me which was kind of frustrating as well. I think that the L'oreal Voluminous Butterfly Mascara is one of the best mascaras I have ever used. It holds a curl like no other, and it lengthened and volumized my lashes at the same time. If you don't like your mascara to dry hard, than this one isn't for you. If that doesn't bother you, I highly suggest trying this one. For my bottom lashes, I used Maybelline The Rocket Volume Express Waterproof Mascara, and it worked really nicely. 
 I used up the Maybelline Instant Age Rewind Concealer in Fair. I really liked this stuff. It has nice coverage and is easily blendable. I was having trouble with the skin around my eyes burning towards the end which I think is just a problem with my sensitive skin and the treatment aspect of this product. I still think it's a great one to try if you are on the hunt for a new drugstore concealer. To clean my brushes, I use the Johnson's Baby Shampoo. It leaves them very soft and clean. Plus, it only costs 99 cents in the travel aisle for a bottle this size.

Skincare

The Biore Self Heating One Minute Mask does leave you skin feeling nice and cleansed. I don't know that it's really worth it though. It has charcoal in it which is supposed to draw impurities out of the skin. Personally, I don't feel like one minute on my face is enough time to really draw anything out of it. Also, this has menthol in it to create the heating sensation. Menthol, as an ingredient, can actually cause skin irritation. I didn't have any problems with it, but that was a common problem that I saw online. I got a sample of the Merle Norman Nightly Moisture Cream in one of the free gifts with purchase that they do seasonally. I liked it, but I much prefer my First Aid Beauty Ultra Repair Cream to this one. A pack of Cotton Rounds is always a necessity to remove eye makeup. I also finished up a bottle of Neutrogena Oil Free Eye Makeup Remover shortly after I had taken the picture for this post. 
I used up A LOT of different kinds of makeup wipes in the the past few months. I've been on the hunt for something that wouldn't burn the skin around my eyes, so I could use it on my entire face. That makeup wipe has yet to be found. I tried the Yes to Cucumbers Makeup Removing Wipes, Yes to Blueberries Makeup Removing Wipes, and Olay Fresh Effects Everything Off Makeup Removing Wipes. They all got my makeup off really well, but they weren't worth the burning to deal with. I chose to try all of these on YouTube recommendations from people saying that they didn't burn their skin, so I'm sure if your skin isn't as crazy sensitive as mine that one of these will work nicely for you. I particularly love the packaging of the Yes to Wipes because the package is truly resealable (which keeps the wipes from drying out over time) unlike most wipes from the drugstore. They have 4 or 5 different options, so I would check out that brand first. Lastly, I tried the Almay Eye Makeup Remover Pads. These come presoaked in product which is convenient, but the pads were a little too small for me. I like to cover my whole eye with the makeup removing pad, and let it sit there for a second to give it time to break down any mascara or waterproof eyeliner. These weren't big enough to do that.

Haircare

When I first bleached my hair, I chose the Herbal Essences Color Me Happy Conditioner and shampoo as well. Together, they really made my hair overly greasy which is why I abandoned the shampoo a long time ago. The conditioner worked fine and left my hair soft. I'm really not too picky about it. I liked the way it smelled, so I went ahead and finished it up. I finished my second can of Batiste Dry Shampoo in Deep Dark Brown. I love this stuff because it doesn't leave that gray cast on your hair, and you don't have to worry about white residue. It also really does clean your hair. You can pick it up at Ulta, and they have one to match most hair colors.

Shower Things

I really love the Dove Deep Moisture Body Wash. It lathers well, and it really absorbs into your skin. Also, I really love the smell of it because it is clean and fresh. I think it smells a lot like the traditional Dove bar soap does just in liquid form. The product inside the EOS Travel Size Shaving Cream is amazing, but the packaging is terrible. You can't get a product that thick successful out of a package that is designed the way it is. I was having to take the top off and scoop it out after the first time I used it. The EOS shaving cream is really great because it really feels more like a lotion. It leaves you legs super moisturized and smells so nice (I love the strawberry scent personally). Just spend the extra two dollars, and get the real product with a pump.

Perfumes

The VS Bombshells in Bloom Sample was really light and summery. If you aren't following Victoria's Secret on Instagram, you need to just for the posts they do about this. Every few Saturdays, they post that it is "Sample Saturday." All you have to do is go into the store, and try something on to get the free sample of whatever it is. The past few ones have been perfumes because VS has about a million of those. The tiny bottle they gave me lasted about a week and half, so I'm definitely hoping to pick up more samples in the future. The Katy Perry Purr Perfume is a completely different story. I think I've had this bottle since high school, and I don't know how it is has lasted me this long. I didn't really learn where to spray perfume until I went to college, so I spent a lot of time just doing a couple sprays and walking through them. The scent is fresh and a tad bit fruity in my opinion. This is definitely my favorite of her 4 perfumes, and the bottle is adorable. I don't even like cats that much, but I'm still a sucker for it.

Disclaimer: Some links above are affiliate links.

Oh man, that was a lot of products. Hopefully, you found it interesting to see what another person has used to the last drop. What products have you finished lately and loved?

Share
Tweet
Pin
Share
1 comments
Hello! Back in December, I told you all about what I wore to my winter formal (If you haven't seen that, check it out here). Recently, I realized I never talked about my spring formal. I know I was looking for ideas on how to style myself as we had a theme. The people who planned it choose to make it Great Gatsby themed which I absolutely loved. That meant lots of sequins and lots of makeup. Personally, I took my inspiration from The Great Gatsby movie that came out recently, and I went for a lot of black and gold. Even though, it's been 4 months since I went to that. I thought I would share what I wore to it anyways in case you've got any '20s themed parties coming up! I'll tell you where it is all from and the makeup look I choose below with the tutorial I followed.


Let's start with the most important part: the dress. I picked that up from my local Dillard's clearance store. If you have one of those in your area, they are a great place to find a formal dress like this one. There were a ton available, and they were all really marked down. My dress was originally $150 and was marked down to $26. All my jewelry is from Charlotte Russe including the head piece which I was also wearing when I updated you on my ombre hair. I choose that one because it has the little daisies on it. I thought that was super appropriate as a main character's name is Daisy, and it is my social club's flower. My shoes are Kenneth Cole Reaction.

I did the most research about what makeup look I was going to go for because I didn't even know where to start. I found out some interesting information that I thought I would share with you. The 1920s was the first decade in which it was socially acceptable for all women to wear makeup (before it had just been the actresses). Because it was a new thing for them, they wore A LOT of it. They would actually buy their foundation a shade too light to look paler, draw on their eyebrows to be really thin, and shape their lips differently. While I didn't do any of that, I still had a lot more makeup on than I am used to. They also did eyeshadow differently than we do. We tend to concentrate the darkest colors on the outside of our eye and the lightest on the inside. It makes our eyes look more open and awake. They choose to place the lightest color right in the center of their lids and went for a hazy, heavily blended smoky look through the socket of their eye. We also normally choose between focusing on the eyes or lips, and they did both most of the time. I'll include some pictures of what my makeup looked like and the tutorial I followed below. I used my NYX Nude on Nude palette for my eyes with a bit of a Wet N Wild shadow for the center of the lid shade. My lipstick in my trusty Rimmel Kate Moss in the shade 01 which I talked about in detail here.


Hopefully this gave you a little inspiration if you've got anything like this coming up!
Share
Tweet
Pin
Share
1 comments
Hello! Welcome to my first ever Face of the Day! Basically, I'm just to give you a rundown of the products that I'm wearing in the pictures below. I'll share how I used them or why I like them. I was inspired to do one of these because I've been loving two particular products lately which are the Kat Von D Tattoo Liner and the Maybelline Color Tattoo in Bad to the Bronze. They both have tattoo in the name which for some reason screamed to me to post about them together. I also want to take as many pictures with purple hair as possible. All the pictures and info are below!


Base:

Merle Norman Purely Mineral Makeup in L10
This is my most repurchased makeup product by far. It is actually the first foundation that I ever had. If you have sensitive skin and you have a Merle Norman store near you, I would highly suggest popping in. They have products that my mother and I both swear by. This is a great foundation for the spring and summer time. It evens out your complexion, but it still looks like your skin. The birthmark on my forehead and the few freckles I have still come through. You wouldn't believe the amount of compliments I get on my complexion when I wearing this. If you aren't in need of heavy duty coverage, this would be a good one to try.
I recently started using the Maybelline Dream Lumi Touch in Radiant for covering any dark circles. So far, I am loving it. Rather than just covering the area, it really brightens it up. I've been really wanting to buy the YSL Touche Éclat which does the same thing, but I can't get past the 40 dollar price tag. Maybelline and YSL are actually owned by the same company, so I did some research. I think the Dream Lumi Touch concealer is a super similar option, and I've heard it actually has more coverage. If the fact that they are owned by the same company doesn't convince you, the label is in both English and French. Touch in French is "touche," and you'll never guess what the word for radiant is. If you guessed "éclat," you win this little virtual guessing game. That's enough convincing for me. I pair that concealer with the Revlon Photoready Concealer in 002 Light for any spots or redness.
I've gotten in the habit of using two powders lately. I set my face with Maybelline Dream Wonder in 15 Ivory and go back over the more oily areas of my face (which for me are my nose and chin) with the Rimmel Stay Matte Powder in 001 Translucent. This combo really helps my makeup last all day and keeps the dreaded shine at bay for me.

Eyes:

Now for the focus of this look. I used my Maybelline Color Tattoo Cream Shadow in 25 Bad to the Bronze as an all over the lid color. If you don't have one of these, I couldn't recommend them more highly. They don't budge or crease and are so easy to apply. I love this color in particular because it goes with a lot of looks. You can make it smoky or soft and go for a bold or neutral lip. It all works. I also think a bronze shades really works to make a lot of eye colors stand out.
I popped some of the Merle Norman Eye Shadow in Cocoa in the crease to add some definition. I also ran this along my bottom lash line. I like to use shadow there instead of liner to keep everything looking soft. 
Then, I grabbed my Kat Von D Tattoo Liner in Trooper and went for a cat eye. I just recently picked this up at Sephora. I've been on the hunt for a go-to liquid liner, and I think I found it. This one comes in pen form, but it has a brush tip rather than a felt tip. It makes it so easy to apply in my opinion (If you are a person who needs the tip of your liner pen to be stiff for your liner to be perfect, then you'll want to skip this one). The color can be super black with 2 coats or a little softer with 1. It dries quickly, and it stays all day. I can put this on in the morning, and it will look just as good when I go to take my makeup off that night. I am obsessed with it so far. I'll keep you updated if my eyeliner opinions change. For now, I plan to be repurchasing this one for a long time.
I finished the look off with some Rimmel Scandaleyes Retro Glam Mascara in 001 Black on my top and bottom lashes.

Lips and Cheecks:

To be completely honest, the Wet N Wild Blush in 831E Pearlescent Pink is actually the only one I currently own. If I'm ever wearing blush, it's this one. It costs 3 dollars at the drugstore and is very nicely pigmented. It's widely considered a dupe for the blush that I see talked about the most on the internet which is Nars Orgasm, and it is only 1/10 of the price.
I wanted this look to be about the eyes, so I stuck with the Milani Brilliant Shine Lip Gloss in Pink Lady which is a soft pink. Although, I think this eye look is soft enough to consider pairing a bright lip with this look if you are feeling it.

What products have you been loving lately?

P.S. Last week, I installed the Disqus commenting system onto my blog which means you can now comment if you have a Twitter, Facebook, or. Google +. You can even comment as a guest if you like! :)


Share
Tweet
Pin
Share
2 comments
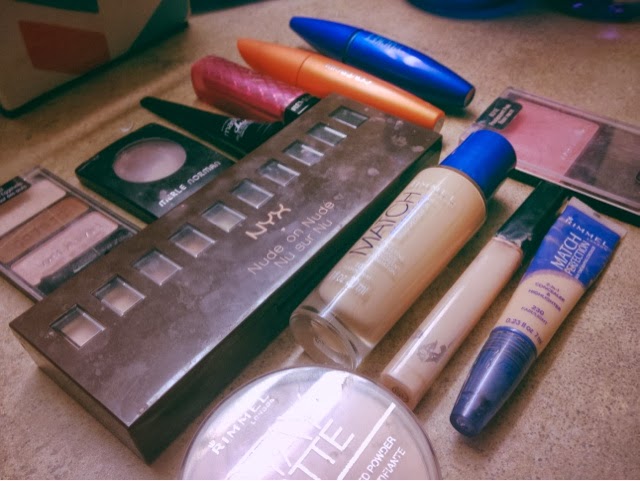
Hey guys! So, I know that I'm supposed to have my 3rd and final Taylor Swift style steal for you today. Because I am currently at home on spring break and without a lot of my clothes, I couldn't get it together for this week. That will be up next Saturday. I didn't want to leave you postless, so I threw a little something together. I'm going to be talking about what I brought home with me in my travel make up bag. Before I start this, there are two things you need to know. First, I got this makeup bag at Forever 21 for $6. I think it is absolutely adorable, and I'm a bit obsessed with it. Second, I am an over packer to the max. I brought home 4 lipsticks, FOUR. I knew I didn't need them all. I just couldn't bear to not have the option of wearing them. Now that I let you in on that little secret, let's talk about all the things I brought home.

This is everything from the top. That smaller bag does fit into my makeup bag.
I like to bring it along for my brushes. I don't want them getting dirty
or losing any bristles, so I find it best to separate them.


Now it's time for one big products list!

Brushes:
Powder Brush
elf Powder Brush - used for mineral foundation
Real Techniques Expert Face Brush - used for liquid foundation & concealer blending
elf Blending Eyeshadow brush
Eyeshadow Crease brush

Face:
Merle Norman Purely Mineral Makeup in L10
Rimmel Match Perfection Foundation in 101 Classic Ivory
Rimmel Match Perfection Concealer in 230 Fair/Light - used for concealing around the eyes
Maybelline Instant Age Rewind Concealer in Fair - used for any spots or redness
Maybelline Dream Wonder Powder in 15 Ivory

Eyes: 
Wet N Wild Color Icon Trio in 380B Walking on Eggshells
Merle Norman Eye Shadow in Sunbeam
Merle Norman Eye Shadow in Sugar Plum
Merle Norman Eye Shadow in Cocoa
Jordana Fabuliner in 01 Black (One note on this: If you are looking for a waterproof liquid liner, this is definitely not it. It comes off if your eyes are even a little watery. It is great for easy application though since it works like a felt tip pen).
Rimmel Exaggerate Eyeliner in 261 Noir

Lips:
Maybelline the Vivids Collection - 905 Brazen Berry
Wet N Wild - 508A Black Orchid
Princessa Aloe Lipstick in Green (I've finally got my hands on that magical color changing lipstick. Post coming soon!)
Revlon Colorburst Balm Stain in 045 Romantic

Nails:
Wet N Wild Megalast Nail Polish in 213C On a Trip
Sally Hansen Double Duty Base & Top Coat (Not Shown)

Tools: 
Spoolie - used for eyebrow taming
Revlon eyelash curlers
Sally Hansen tweezers
Baby Oil - used for easy lipstick removal
Cotton Pads for makeup removal

I tried to keep everything pretty light. I did want to give my skin as much of a break as possible, so I didn't touch my liquid foundation at all. I just wanted to bring it in case I had any breakouts that would need a little extra coverage. Also, I ended up having some eye troubles, so I couldn't wear my eye makeup for 3 days this week. In case you are ever in that situation, I compensated by making sure my skin looked as flawless as possible and then throwing on a bright lipstick. I quite liked the way that looked in the end, and the lipstick somehow makes it look like you are more put together than you might feel. 

What are some products that you have to take on every trip with you?

P.S. Saturdays are normally style days here, so I wanted to include something I saw this week on that topic. A blogger that I love actually posted a YouTube video about defining your personal style. You can check out her blog at http://www.beautycrush.co.uk! I absolutely loved the video, so I thought it was worth sharing here! 

Share
Tweet
Pin
Share
1 comments
Just like I promised, I'm back with a Valentine's Day makeup idea. I wanted to keep everything really simple, and I added a lot of pink elements throughout the look. If you can't wear pink makeup on Valentine's Day, when can you? Don't worry though, it's all very soft and subtle. All the makeup I used is below along with a few steps on how to achieve it. Here's how it turned out! 

For the face, I used Rimmel Match Perfection foundation in 101 Classic Ivory. Make sure to really blend this in, and don't use too much! We don't need cake face on Valentine's Day. For concealers, I used Rimmel Match Perfection in 230 Fair/Light around my eyes and the Maybelline Fit Me concealer in 15 Fair on any spots or redness. I powdered all that with Rimmel Stay Matte in 001 Transparent. The Match Perfection foundation is a little wet, so you are definitely going to have to set it with something. I used my Wet N Wild 831E Pearlescent Pink blush for a little flush of shimmery pink on the cheeks.
Close up of products used for the eyes including the matte rose pink color from the NYX Nude on Nude palette, Wet N Wild's Walking on Eggshells Color Icon Trio, and Merle Norman Eyeshadow in Sugar Plum.
I wanted to include a closeup of the matte rosy pink that I used from Nude on Nude as that palette doesn't have shadow names. It really softened up the whole eye. Because it is a matte color, it doesn't reflect any light, so it works well for a light crease definition without looking too harsh or overdone.  On the right, I added some swatches. From left to right, those are the brow bone shade from the Walking on Eggshells trio, Merle Norman Sugar Plum, NYX rose shadow, and the eyelid color from the Walking on Eggshells trio. 

I applied the eyelid color from Wet N Wild trio across the entire lid, the NYX shadow through the crease, Sugar Plum in the outer V of my eye (be sure to blend), and the brow bone color from the trio as an inner corner highlight. That could also be used to highlight your whole face if you like a shimmery highlighter. I added Maybelline's Master Duo by EyeStudio Liquid Eyeliner in 500 Black Laquer across my lash line. The liner is super pigmented (make sure to shake it), and it lasts all day on me. For a little added flare, just flick that out, and add a cat eye for drama. Then, I used my Maybelline The Rocket mascara in black/brown on my bottom lashes. I love using it there because it's waterproof, so no running! Curl those top lashes, and add 2 coats of Covergirl Lash Blast mascara in black. Lastly, I used one quick coat of Revlon's Lip Butter in 010 Raspberry Pie which I talked about here! Just go over the lip and blend with your finger to really soften the color up. If you are worried about eating with the lipstick, just skip it and go with a tinted balm instead.

Hope this gave you a bit of inspiration for this Friday!


Share
Tweet
Pin
Share
No comments
My school had our first ever winter formal last night. My mom and I did some serious online shopping and found the perfect dress! We found it at Dillard's. It is a Morgan & Co. Lace V-Back Gown, and it was only $89 which is pretty good for a formal dress in my opinion. It also comes in black if you are interested in it. My mom wanted me to add that it does have nude paneling underneath the lace. You won't have to worry about trying to find a slip or tank top to go underneath it.
Link to buy this dress!


If this dress looks familiar, that's because it is! After I had already ordered this dress, I realized I had seen something very similar on one Miss Taylor Swift at the 2012 Billboard Music Awards. I remember thinking she looked insanely beautiful this night, so I was pretty excited to find a dress so close to hers! I decided to go ahead and make my makeup similar to what I normally see her wearing. She always has a flawless face. It is a bit luminous, and her skin looks incredible smooth. That was step number one. Then, I decided to go for a more neutral eye that was still a bit smoky and winged eyeliner (of course)! I kept the lips neutral just like she did as I feel throwing on a bold lip with such a bright red dress would overpower it all a bit. I think it turned out pretty well. I'm going to take you through all the products that I used to achieve the look I just described.


Swatches From Left to Right: 1) I attempted to recreate the color of Barely
Branded as my roommate took it home this weekend, but it would be much
more pigmented than shown here. 2) Merle Norman Desert Shimmer 3) Merle
Norman Semi-Matte Cocoa 4) Merle Norman Sugar Plum
 5) Highlight Shade from Walking on Eggshells

Primer: Revlon Photoready and mark Please Hold Eye Primer
Foundation: Rimmel Match Perfection in 101 Classic Ivory
Concealers: Rimmel Match Perfection in 230 Fair/Light for under my eyes and Maybelline Fit Me Concealer in 15 Fair for any redness or blemishes
Powder: Rimmel Stay Matte in 001 Transparent
Blush: Wet N Wild Color Icon Blush in 831E Pearlescent Pink (which I've heard is a great dupe for Nars Orgasm if any of you are on the hunt for that)
Highlighter: Top shadow from the Wet N Wild Walking on Eggshells Trio
Shadows Used: Maybelline Color Tattoo in Barely Branded (lid), Merle Norman Eye Shadows in Sugar Plum (outer half of lid), Desert Shimmer (crease), and Cocoa (crease definer), Wet N Wild Color Icon Trio in C380B Walking on Eggshells (inner corners)
Eyeliners: Covergirl Perfect Point Plus Eyeliner in 210 Espresso on the bottom and mark What a Line Felt Tip Liner in Brownie Points for the top
Mascara: Maybelline The Rocket Volume Express in Brownish Black
Lips: Maybelline Baby Lips in Cherry Me


I wanted to be sure to throw in a few pictures from my night! Have you ever gone with a celebrity inspiration for a special event? 


Share
Tweet
Pin
Share
No comments
Older Posts

Follow Me


Search This Blog

Popular Posts

  • Lime Crime Venus Palette Dupe!
    I mentioned that I had been wanting some "in your face" red eyeshadow in this post  where I talked about a Modern Renaissance D...
  • My Bridesmaids Picks From MillyBridal UK
    Hello! It's finally summer and you know that means...Wedding Season! I shared some prom picks previously, and today I want to share some...
  • DIY Giant Photo Collage
    While I am home, I wanted to share how I have displayed the pictures in my room. I plan to share my dorm room wall whenever I have finished ...

// My Instagram Feed //

Created with by BeautyTemplates| Distributed By Gooyaabi Templates